Senin, 14 Februari 2011

Kismiss Sub Title

At this section, we will be shown how to add sub title to enhance information of the report. We just need to add some rows of code. Let's see the code below :

KismissReport report = KismissReport.getInstance();
List<Object> subs = new ArrayList<Object>();
subs.add("Business Developement Indicator");

params.put(ReportFactory.SUB_TITLE, subs);
params.put(ReportFactory.TITLE, "TEST KISMISS REPORT");
params.put(ReportFactory.INFOTITLE, "Report");
params.put(ReportFactory.REPORT_NAME, "employeeTest.pdf");
report.setVisibleField(new String[]{"id","firstName","lastName","capacity"});
report.generateAnnotatedPdfFiles(Employee.class, employees, "D:/Personal/Test/", params, group);

When we run the above code, our report will be added “Business Developement Indicator” as our report's subtitle, see the result below :


KismissReport report = KismissReport.getInstance();
List<Object> subs = new ArrayList<Object>();
subs.add("Business Developement Indicator");
subs.add(new SubTitle("Print Date :"+new SimpleDateFormat("dd MMM yyyy hh:mm:ss").format(new Date()), "Print By : Hong Kisman"));

params.put(ReportFactory.SUB_TITLE, subs);
params.put(ReportFactory.TITLE, "TEST KISMISS REPORT");
params.put(ReportFactory.INFOTITLE, "Report");
params.put(ReportFactory.REPORT_NAME, "employeeTest.pdf");
report.setVisibleField(new String[]{"id","firstName","lastName","capacity"});
report.generateAnnotatedPdfFiles(Employee.class, employees, "D:/Personal/Test/", params, group);

At the code above, we add a SubTitle instance class to sub title collection, the report we print “Print Date” at the left side and “Print By” at the right side.
Let's see the report result as follow :


Coloring Header background

We can change the background color of header by defining the “columnHeaderColor” at “Header” tag.

Let us give a color to our employee report header, the “Employee.java” will be look like :

...
/**
    * @author Kisman Hong
    * test Kismiss Reports
*/
@Kismiss(name = "Employee", columnAutoSize=true)
@Header(columnHeaderHeight=45, isColumnHeaderBold=true, columnHeaderColor ="#BDBBBC")
@Detail(lineWidth=0.5)
public class Employee {
   …
}


The code above tell us to give the column header color, then the result will be looked like :


Kismiss Multi Row Header

At this section, we will learn how to draw multi rows at report header. For multi rows header we need to define the properties of getter method. The example code below show us how to multi header :

package com.softtech.kismiss.elevenExample;

import com.softtech.kismiss.enumer.CalculationType;
import com.softtech.kismiss.property.Header;
import com.softtech.kismiss.property.Calculation;
import com.softtech.kismiss.property.Kismiss;
import com.softtech.kismiss.property.Property;

/**
    * @author Kisman Hong
    * test Kismiss Reports
*/
@Kismiss(name = "Employee", columnAutoSize=true)
@Header(columnHeaderHeight=45, isColumnHeaderBold=true)
@Detail(lineWidth=0.5)
public class Employee {
    ...
    @Property(width = 100, position = 1, columnHierarchy={"NAME"}, heightPortion=     {15})
    public String getFirstName() {
      return firstName;
    }

    public void setFirstName(String firstName) {
      this.firstName = firstName;
    }

    @Property(width = 100, position = 2, columnHierarchy={"NAME"}, heightPortion={15})
    public String getLastName() {
      return lastName;
    }

    public void setLastName(String lastName) {
      this.lastName = lastName;
    }
    ...
}


By adding “columnHierarchy” at property, we tell kismiss to define parent field name, “heightPortion” indicate the height of the parent field.

Let us take a look to our report result :

Note :
Make sure the fields to be group in header have the position side by side.
We can add the header height by define “columnHeaderHeight” in Header tag.


Kismiss Field Group

At this section, kismiss give a bonus feature to prepare fields name for grouping. By putting “FieldGroup” tag on top of field name in JavaBean class, we tell kismiss that the fields are used for dynamic group.

This feature is quite simple, only by adding FieldGroup tag like shown below :

    @FieldGroup(label={"firstName:Employee First Name","lastName"})
    private Employee employee;

    @FieldGroup
    private String lastName;

    @FieldGroup
    private String firstName;

    @FieldGroup(label="Alamak")
    private String address;

    @FieldGroup
    private double phoneNumber;

    @FieldGroup
    private String postCode;

After defining the tag, we must add some code when generating report, like :

Map<String,String> fieldsGroup = GroupUtils.getInstance(). groupPropertyForClass(Employee.class);


Then we must passing the fieldsGroup to jsp file in dropdown box or others.

Kismiss Dynamic Field

At this section, kismiss introduce a feature to define field to be shown dynamically. We choose the field(s) to generated to report. This feature is easy to use and simple to implement.
This feature can be used by calling the “setVisibleField” method in the report instance. Code will look like :

   KismissReport report = KismissReport.getInstance();
     params.put(ReportFactory.TITLE, "TEST KISMISS REPORT");
     params.put(ReportFactory.INFOTITLE, "Report");
     params.put(ReportFactory.REPORT_NAME, "employeeTest.pdf");
     report.setVisibleField(new String[]{"id","firstName","lastName","capacity"});
     report.generateAnnotatedPdfFiles(Employee.class, employees, "D:/Personal/Test/", params, group);

This example tell us that the fields to be shown in report are “id”, “firstName”, “lastName”, and “capacity” only. Kismiss will generate the report based on field name of the report declared in JavaBean. See the following report :


Kismiss Dynamic Grouping

Kismiss provide one powerful feature, dynamic grouping. We can group field dynamically as the user want. We just passing the field to be grouped, kismiss will generate the report based on the field group chosen.

When using dynamic grouping, we need not to declare grouping in JavaBean class, but it will be defined outside the class.

Then our “Employee.java” will be :


@Kismiss(name = "Employee")
@Header
@Detail
public class Employee {
...
}


We don't need to define “Group” tag anymore.

Before we call the report generate method, we need to define our field group. Our code will look like :

KismissReport report = KismissReport.getInstance();

HashMap<String, Object> params = new HashMap<String, Object>();
params.put(ReportFactory.TITLE, "TEST KISMISS REPORT");
params.put(ReportFactory.INFOTITLE, "Report");
params.put(ReportFactory.REPORT_NAME, "employeeTest.pdf");
List<Calculation> calculations = new ArrayList<Calculation>();
Calculation calculation = new Calculation("capacity", CalculationType.Sum, "#",  "Sum Capacity", VerticalAlignment.Middle, HorizontalAlignment.Right);
calculations.add(calculation);
com.softtech.kismiss.access.Group group = new com.softtech.kismiss.access.Group("firstName", calculations, 20, 20);
group.setCalculationPrintType(CalculationPrintType.Complete);

report.generateAnnotatedPdfFiles(Employee.class, employees, "D:/Personal/Test/", params, group);

By declaring field in code, we have flexibility to define field group dynamically, only by passing the name of field to be grouped and calculation that included to that group.

In the example above, we can see that the report group by “firstName” and calculate the “capacity” with “Sum” CalculationType.


Kismiss Group and Calculation

At this section, we will learn how to define group and calculation. It's not difficult for grouping and calculating field.

@Kismiss(name = "Employee", columnAutoSize=true)
@Header
@Group(calculation = {"capacity : Sum"}, groupBy="firstName", calculationPrintType=CalculationPrintType.Complete)
public class Employee {
...
}

calculation defining in a group, this example tell us that the employee report group by “firstName” and calculate the “capacity” with “Sum” caculation type.

If the group want to omitted we can set isShowInDetail in Property Tag to “false”. This tell kismiss not to display and operate the field.
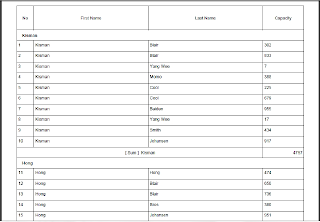
See the example report that using group and calculation :


Look at the report result, we can see that the report group by “firstName” and Sum the “capacity” based on “firstName”. This is not a difficult way to do.

We can also calculate the capacity field by adding calculation tag to “getCapacity” method, this calculation will calculate all the data. Modify the code as below :

package com.softtech.kismiss.seventhExample;
import com.softtech.kismiss.enumer.CalculationType;
import com.softtech.kismiss.property.Header;
import com.softtech.kismiss.property.Calculation;
import com.softtech.kismiss.property.Kismiss;
import com.softtech.kismiss.property.Property;

@Kismiss(name = "Employee", columnAutoSize=true)
@Header
@Detail(lineWidth=0.5)
public class Employee { …
    @Property(width = 35, position = 8)
    @Calculation(attribute = "capacity", calculationType = CalculationType.Sum)
    public int getCapacity() {
      return capacity;
    } …
}

The report will be shown as :